
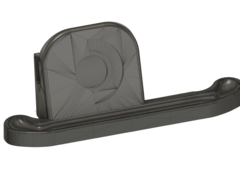
This version has a tighter fit and can reach deeper into the Ethernet port.
It’s a remix of https://www.thingiverse.com/thing:5191532
RJ45 replacement in two parts [stronger & tighter fit]

This version has a tighter fit and can reach deeper into the Ethernet port.
It’s a remix of https://www.thingiverse.com/thing:5191532
This Dock is a remix of neebick Display Dock to fit my USB-C Hub that I currently plan to use when I receive my steam deck.
Its a fairly easy print however you will need supports in some places and will need to have it angled on the print bed too fit smaller printers.
Where the hub goes in on the back is a fairly tight fit so it cant fall out of the loops easily.
USB Hub to go with this dock:
Amazon: Cable Creation 7 in 1 USB-C HUB
Printed with Sunlu Black PLA
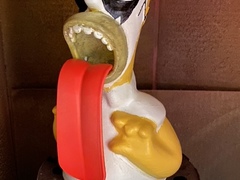
Its a shoehorn holder
Head creds to Drivernator
Body creds to SheridanUA
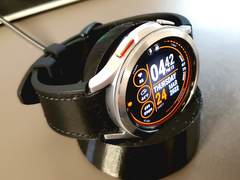
I bought a new Samsung Galaxy Watch 4 Classic (46mm) and I wanted a charging doc for it. I printed JSC’s Apple Watch Charging Dock for a friend a while ago and really liked it.
He was kind enough to post the Fusion 360 file so I modified it for my watch.
I included the STEP and modified f3d file too.
Slight update: I made the USB connector channel a bit wider as it was a bit tight and I had to file it down after printing.
Yet Another update: I made a V3. Wider USB channel, higher USB cable path, and a curved rest for the watch. I left V2 here too with the STEP and f3d file for both versions. (Yellow PLA is V2, Black PETG is V3)
Now a V4 for people with Brass inserts. I didn’t like the USB cable coming loose and I had spare inserts and countersunk M4 screws. STEP and f3d file attached.
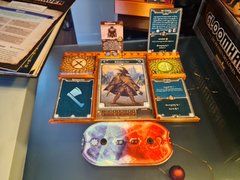
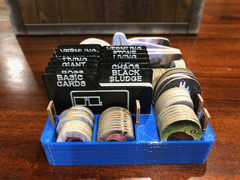
I am fairly new to JOTL, but I liked UnclePats player dashboard so much (lightweight, easily fits into the games box (even two of them like in my case), easily to understand but still versatile layout, …) so much that I tried to improve – or should I say adapt it to my needs – a little more.
Please note: You’ll need glue to join the two parts of the dashboard.
You may combine the left or right part of the dashboard with the card spacer STL in Microsoft 3D Builder or any other model editing software before printing or just glue them in place after.
And just like after every print there are things to improve but not game-breaking neither. e.g. I didn’t realize the lowest point of the card slopes is so thin.
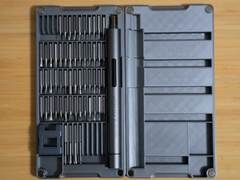
A case for the Xiaomi Wowstick that fits all the bits and more. Bits are can be held on with magnets for extra security.
Check out this model and my other work on PrusaPrinters
This is a remix of https://www.thingiverse.com/thing:4732869.
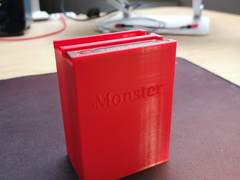
The original lids of the monster boxes where just a little bit to small. The initiative tokens tend to vary in size. I made the lids 0.5mm broader such that my initiative markers fit and dont get scratched.
Oh, and I added some text on one side of the box.
Print four of the character trays from here:
https://www.thingiverse.com/thing:4612926
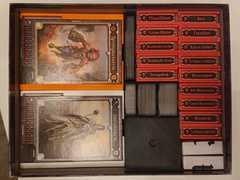
I had to redesign the complete rest, because the initiative token are longer in the german edition. I made small boxes for all monsters (cards & token). The ‚lid‘ is the initiative token. The other cards come with more boxes, here and there it is a tight fight, but during the game more and more cards get added to the characters.
All other tokens are piled up in the three bowls (Schale_1, Schale_2, Token) which stack nicely.
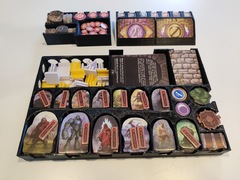
I love the new expansion for Gloomhaven (Jaws of the Lion), but it is a really complex game with tons of components that can take a long time to unpack/repack before/after each game. I made this organizer/gameplay tray to keep everything organized and minimize set up time!
Everything fits in the box, but it does raise the lid by about 2-4 mm.
I have only stored this box horizontally, so I don’t know if the pieces will shift out of their trays if you store it vertically, but if you store it tightly, then everything should stay in place.
Note: the wedge and clip are for the enemy trays (print 2 of these, btw). The clip keeps the 2 halves of the enemy tray together, while the wedge makes it slightly more easy to get monster cards out of the tray.
Enjoy!
This is a mini organizer for Gloomhaven: Jaws Of The Lion. It works with the included insert to organize all of the monster tokens and cards as using the little resealable bags I found didn’t really work so well.
Things are very tight in that space, so the orientation and organization in the tray is not super logical – it’s based on the physical size of things.
The cards have optional dividers, which can be printed in 2 colors if desired (see the photos) to break everything up and allow quick access to the correct cards, but this is also a tight fit. Each of the dividers also has a mini locator on the front to point you to where the associated monster tokens are in the organizer.
I have included a number of photos to show how I have packed everything away so the box will close with no lift. This includes removing the character minis from their boxes (inspired by this video ).
The source code to generate this is available here: https://github.com/sillyfrog/Gloomhaven-Jaws-Of-The-Lion-Organizer (it’s horrible code, but maybe handy if you need to make a quick mod).
Update 2020-09-27
I have added in a couple of small condition token organizers for those that like to keep things super sorted – like us 🙂
This just fits into the tokens tray as shown, and has slots for all of the condition tokens. The source files will be uploaded shortly as well to github.
Update 2020-10-01
Hit Point tokens now have their own holders that fit in the original tray. Source files also on GitHub.