Headphone Stand

The MakerBot Headphone Stand went through the same design process used in professional design and engineering industries. Multiple design iterations and 3D prints led to the final fully 3D printable headphone stand.

The full size stand prints beautifully without any supports and perfectly matches the Replicator+ build volume.

Designer Jackson Seidenberg uses two of these stands at home for his Logitech G930 and Astro a50 headphones.

Floating Cup (smoother look, foolproof assembly)

This is a (still easier to print and assemble) improvement on the previous https://www.thingiverse.com/thing:3617536 . This and that previous submission are both remixes of HappyMoon’s „Floating Cup Sculpture“.

[I’ve edited the files and summary a bit more (July 7, 2019), as I found that printing the ’stream‘ part of the sculpture can be difficult on some printers when printed high off the bed. And that actually, printing it sideways on the bed works and looks much better.
July 19: rotated the „preferred“ version of stream so that it can fit also on a 200mmx200mm bed]

I recently was printing one for my daughter, but managed to attach the „stream“ backwards to the „splash“, which made it lean the wrong way so it wouldn’t stay standing up. So, this one uses a trapezoid-shaped pin (rather than 2 square pins), which both holds the parts together better and also prevents them being attached backwards. Other improvements are that the seam between the stream and the splash has been moved lower where it is even less likely to be noticed; and mass has been removed from the part of the „stream“ that sits inside the cup to improve stability when the sculpture is standing up.

Some tips I’ve figured out:
1) Print the „stream“ part with low infill (10% or even 5%) to minimize the weight of the thick off-center part that is inside the „cup“. Be careful removing this part from the bed, since with low infill it won’t be as strong — don’t try to pry it off by yanking on the long part of the stream! The „stream“ part will need supports, no matter which orientation you choose.
2) Print the „cup“ part at low infill (5%) also and low number of perimeters for least weight. I used PLA and PETG for the cup. You could instead use a styrofoam or paper cup for low weight or for a different look. Test your glue first if you use those, though, to make sure it will stick to them.
3) Print the „splash“ part and the pin with high infill (85% or so, but not quite 100%) to maximize its weight for stability when standing.
4) Only needed if printing the „stream“ upright: then use a smaller nozzle when printing, or at least with somewhat small layer heights (about 0.24mm), so the lines don’t show too much on the near-horizontal areas. Some lines may actually add to the liquid appearance, but lines that are too coarse won’t look right.
5) All parts should be printed oriented as the STLs are provided.
There are now three STL files provided for the „stream“ part, they are exactly the same, but in different orientations for printing. The one marked „preferred“ is for printing on its side, and has turned out to be the most trouble-free to print. In fact, that one is pretty hard to mess up and has a great smooth surface, so it is „preferred“. It uses a little more support material than the „inside down“ version (the one where the large puddle that sits inside the cup lies right on the bed), but gives a very easy to get, smooth surface and is very unlikely to have bed adhesion issues. The „inside down“ version uses the least support material, usually prints well, but shows some texture where the support breaks off in the more horizontal puddle area. The „narrow down“ (don’t use that one!) version has a good surface, but uses the most support material and has proven to be more difficult for some people to print since moving beds and gravity can cause it to topple before support material has been completed. That file is left here for continuity of the file set.
6) It would seem like a good idea to use „wood filled“ filament for the coffee/hot chocolate liquid parts — but don’t! The wood filaments are very brittle and you’ll find the thin upper fluid drips of the „splash“ will break off very easily. Black or brown PLA would be a better choice, or other colors for other beverages.
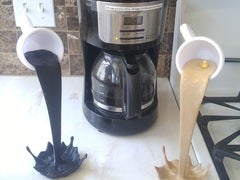
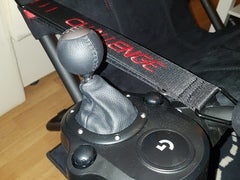
7) I’ve used super-glue (cyanoacrylate) gel or clear 2-part epoxy glue (best choice) to attach the stream, pin, and splash parts. Test-fit the pieces first (!), file mating surfaces if necessary. You may need to trim the edges of the „pin“ if there is any ‚elephant’s foot‘ on the print — choose the best fitting pin from the set, and use a razor knife, file or sandpaper to trim any squished edges. THEN, after adding glue and assembling, stand it up on a table near a wall with the part of the stream that will go into the cup pushed slightly against the wall to make it lean a little more toward over the „splash“ (see photo). Most important is to prevent it from leaning the other way as gravity would tend to take it! Leave it set against the wall like that until the glue cures. As with any time you use epoxy or superglue, avoid moving the glued joint while it cures.
8) I’ve used clear epoxy or super-glue gel for attaching cup to the stream, epoxy seems the best. Hot melt glue might work as well, but be careful as it might also warp the walls of parts. Put glue only onto the surfaces of the stream that actually contact the inside of the cup to keep weight low there.
9) The best way I’ve found to hold the cup and stream together while glue sets is to use a small ratcheting bar clamp or C clamp — keep the stream down against the cup all the way to its back.
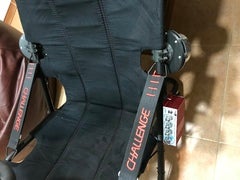
But almost as good is to just lie the cup on its side at the edge of a table and then put the stream&splash inside of it after glue applied, with the splash part hanging under the table. Let gravity do the work.
It might be a good idea to stack up some cards under the back of the cup (not shown in the photo) so that the cup stays tipping forward during curing to help balance.
10) (yes, there’s a duck swimming in the ‚with cream‘ coffee cup. My daughter likes ducks, what can I say?) 🙂

There is a file of trapezoidal pins scaled to a range of sizes, used to attach the „splash“ to the „stream“ and keep them aligned. Choose the largest one that fits into the sockets in the „stream“ and „splash“ parts. Trimming their edges with a knife or clipper, or sanding them down may be required.


similar pouring cups using the same type construction:
Floating goblet: https://www.thingiverse.com/thing:3761400
Floating skull: https://www.thingiverse.com/thing:3772304
related stls

Foldable Batarang (Batman: Arkham Knight)

This is based on the original thing by ChaosCoreTech and the subsequent remix by Cyphn.

I was not quite satisfied with the stability of the core/logo mechanisms in either the original or remix and decided to rework the model so that it is far more stable and less prone to snapping/breaking.

I designed a snapping mechanism so that the logos stay secure and oriented properly. The cap pieces snap easily into each other and are rather easily removed as well. You can see my cross section analysis to get an idea of what the snapping mechanism looks like.

You can also view this explosion animation to see how it is assembled.

In addition to the original open/batarang function, the blade also folds down about half way so it can be used in a slashing or stabbing motion with a comfortable grip.

The tolerances on the core/wings is purposefully very tight so that the wings to do not move loosely. It will be a very tight fit, but it fits (I’ve printed out like 8 of them). If you are unsatisfied with how tight they are, some light sanding will do the trick.

I re-used Cyphn’s limiting wall on the rear cap piece so the blade is limited in how far it can be opened. Admittedly, this piece is easy to snap/break in my design, but I am not likely to revisit this part of the design as I have ended up preferring it without this nub anyway (since the tolerances are so tight, the blade stays where you set it). If you also prefer it this way, simply snap it off, haha.

Overall, I feel like this design incorporates the best ideas from both the things it was inspired from and provides a very stable/strong core/cap mechanism to boot.

Thanks so so so so so much to ChaosCoreTech for making his F360 files available for use. It saved me quite a lot of time. 🙂

Playseat Challenge steering bar looseness fix.

EDIT:

I UPDATED THE DESIGN TO BE A TIGHTER FIT AND EASIER TO INSTALL. THEY’RE SLIGHTLY DIFFERENT FROM THE ONE IN THE INSTALLATION PHOTOS, BUT THE PARTS INSTALL THE SAME WAY AS BEFORE.


These two parts are designed to remove the play in the steering bar of the Challenge racing rig, where it connects to the seat frame.

One part is a bushing that goes around the outside and one part is a plug that is a better fit inside the tube than the stock tube.

The bushing has a hole on the underside which can be used to lock it in place with M4 screws or set screws if it’s a loose fit. Assorted screws via my affiliate link at Bangood:
https://www.banggood.com/300Pcs-M4-M5-M6-Stainless-Steel-Hex-Socket-Cap-Head-Bolts-Screws-Assortment-p-1218506.html?p=HD240528697332015103

Check out my other Playseat Challenge accessories as well:
https://cults3d.com/en/3d-model/gadget/playseat-challenge-thrustmaster-th8-shifter-mount
https://cults3d.com/en/3d-model/gadget/playseat-challenge-headset-vr-hanger

Bodyshaker en Playseat Challenge Lowcost

Sistema de Bodyshaker lowcost para nuestros Playseat Challenge. Probé a instalarlos en diferentes localizaciones y sin duda en esta posición es donde producen mayor vibración y mas sensaciones.
Como programa de pc yo uso SimShaker, que también es más económico que el Simvibe y funciona muy bien.

Basado en el montaje de:
https://www.thingiverse.com/thing:561762
https://www.thingiverse.com/thing:2613282

MATERIALES:

  • 2 Bodyshaker 100w, 4 Ohmios, frecuencia 28 – 55 Hz

  • 1 AMPLIFICADOR Kinter MA-180 (el conector de altavoces está al revés: izquierda es derecha y derecha es izquierda) Personalmente yo uso el amplificador con el BASS casi al máximo y el TREBLE casi al mínimo.

  • 1 ADAPTADOR DE CORRIENTE 12v 5A:

  • Cables de conexión al pc o consola

  • Tornillos:
    La abrazadera va cogida al tubo con tornillos M2,5×20 (tuve que calentar por debajo las tuercas con un soldador para colocarlas en su posición)
    Entre la abrazadera y el plato use tornillos M3x16
    Y entre el plato y los Bodyshaker usé M3x25

  • También usé unas gomas de fontanería que tenia por casa para eliminar ruidos entre los bodyshaker y el plato.

English:

System of Bodyshaker lowcost for our Playseat Challenge. I tried to install them in different locations and definitively in this position it is where they produce excellent vibration and sensations. The program of PC that I have is the SimShaker, which also is more economic than the Simvibe and works very well.

Based on the assembly of:
https://www.thingiverse.com/thing:561762
https://www.thingiverse.com/thing:2613282

MATERIALS:

  • 2 Bodyshaker 100w, 4 Ohms, frequency 28 – 55 Hz

  • 1 AMPLIFIER Kinter MA-180 (the connector of loudspeakers is wrong: left side is right and right it is left) Personally I use the amplifier with the BASS almost to the maximum and the TREBLE almost to the minimum.

  • 1 ADAPTER OF CURRENT 12v 5A:

  • Plug wires to the PC or console

  • Screws: The clasper is taken to the pipe by screws M2,5×20 (I had to warm for below the nuts with a welder to place them in his position) Between the clasper and the plate uses screws M3x16 And between the plate and the Bodyshaker I used M3x25

  • Also I used a few rubbers of plumbing to eliminate noises between the bodyshaker and the plate.

Playseat chair g29 gearshift support

I printed this at .2mm with PET-G. The design is quite sturdy so it should withstand all forces with PLA as well.
After printing the first step is to put two pieces of rubber inside the clamp, where it makes contact with the chair tube. After the support is mounted on the chair I used two leftover screws from my playseat challenge and mounted the gear shifter.
If anyone needs the source files I can share those too.