The episode in [ENGLISH]: http://www.mojoptix.com/?p=108
L’épisode en [FRANCAIS]: http://www.mojoptix.com/?p=75
Note: To see more inventions and contraptions (like this one ), suscribe to Mojoptix on Youtube !
+++++++++++++++++++++++++++++++++++
Update
For those who have trouble slicing the gnomon, I ran the files through netfabb and re-uploaded them as:
— Gnomon_Southern_NETFABBED.stl
— Gnomon_Northen_NETFABBED.stl
Let me know in the comments if they don’t still behave nicely with your slicer.
If you wish to print the gnomon in two halves :
— Gnomon_Northen_half_1_of_2.STL
— Gnomon_Northen_half_1_of_2.STL
They should fit on a 100×100 platform. (Thanks Zarlor for building these two files and fixing them ! )
+++++++++++++++++++++++++++++++++++
[ ENGLISH ]
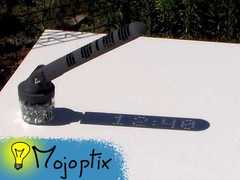
Tadam !
A Sundial displaying the time inside its shadow, with actual digits ! There is a tiny bit of magic inside…
No batteries, no motor, no electronics… It’s all just a really super-fancy shadow show. The shape of the sundial has been mathematically designed to only let through the right sunrays at the right time/angle. This allows to display the actual time with sunlit digits inside the sundial’s shadow.
The sundial displays time (with actual digits !!) from 10:00 until 16:00, updating every 20 minutes.
You can precisely adjust the displayed time simply by rotating the gnomon (the magic box that displays time). So you can even adjust for Daylight Saving Time.
You’ll also need :
— an (empty !) jam jar
— 3x M6 screws, flat head, length = 20 mm
— 1x M6 screw, flat head, length = 50 mm
— 4x M6 nuts
— 4x M6 washer, outside diameter < 14mm
[ FRANCAIS ]
Tadam !
Un cadran solaire qui affiche l’heure dans son ombre avec des vrais chiffres ! C’est un peu magique.
Sans piles, sans moteur, sans électronique, etc… Il s’agit juste d’ombres chinoises très compliquées. La forme du cadran solaire a mathématiquement conçue pour laisser passer uniquement les bons rayons du soleil au bon moment/angle. Cela permet d’afficher l’heure en chiffres lumineux à l’intérieur de l’ombre du cadran solaire.
Le cadran solaire affiche l’heure (avec des vrais chiffres !!) de 10:00 a 16:00 toutes les 20 minutes.
On peut ajuster l’heure en tournant le gnomon (la boite magique qui affiche l’heure) sur lui même, par exemple pour passer de l’heure d’été à l’heure d’hivers.
Vous aurez aussi besoin de :
— un pot de confiture (vide !)
— 3x vis de taille M6, a tete plate, longueur = 20 mm
— 1x vis de taille M6, a tete plate, longueur = 50 mm
— 4x boulon de taille M6
— 4x rondelles de taille M6 diametre exterieur < 14mm
Timelapse: https://www.youtube.com/watch?v=EoGVb82uCnA