My own Version of a Crystal Bottle Stand. You can choose a single or a double Stand. I printed this with 3 Perimeters and that needs round about 120 Gramm of Filament. No Rafts and no support needed.
Enjoy!!
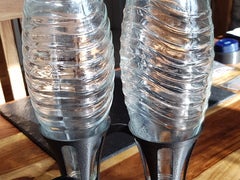
My own Version of a Crystal Bottle Stand. You can choose a single or a double Stand. I printed this with 3 Perimeters and that needs round about 120 Gramm of Filament. No Rafts and no support needed.
Enjoy!!
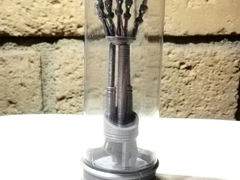
This is a remix for Terminator Arm replica“ by dazvette, modified a little bit in the base to avoid supports, and completed with a „Glass“ container, made of a Parmesan cheese empty PET bottle.
The 85 grams Kraft Parmesan cheese bottle fitted perfect to this 118 mm tall replica.
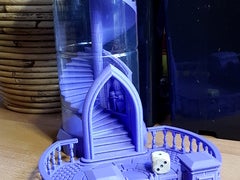
Here’s my take on a dice tower. I really liked the look of all those medieval towers, but also wanted to be able to watch the dice going down. So I designed my own.
This design uses a piece from a plastic soda bottle for the outer wall, diameter 87mm – length 170mm with a straight wall. I used a Dr.Pepper 1,5L bottle. To get the opening for the door, you can place the bottle on the base, then trace along the inside of the door using a pen or pencil. Then cut away the opening.
Note: If you have a bottle with a slightly different diameter, you can scale all the parts by X=d/87, with d diameter in mm. The required length, in mm, would be 170*X. For the 1,5L SmartWater bottle, that’s commonly found in the US, X would be 103.5%.
The little knight is something i liked for decoration in the window behind the entrance. It was sliced and scaled from the model by bs3 (https://www.thingiverse.com/thing:1239427). But it’s optional, you can leave it out or paint or put something else in there to personalise the tower. The measures of the window are width x height x depth:26x45x7mm.
As for printing, I gave all the parts steep angles, so I was hoping they would print without much support, but they still need some, particularly the staircase. It’s all easily removed though, I had no problem cleaning the parts.
Update: new Spiral.stl. The mesh is a lot cleaner now.
Update 21-11-2018: New Top_v2.stl. There where a lot of comments the outer rim came off after printing due to the small contacts in the brickwork. I’ve increased the wall thickness a bit and hope it’s resolved now. Please inform me if it’s still an issue. Also added a step to cover the alignment hole and improved the paving a bit as well.
Update 4-12-2018: Finally found the time to add a matching tray. It will fit on the tower without modification and can be nested for easy transportation. It should print without support if your printer can do some small bridges, but with will probably be safer. (I didn’t design the floral decals at the front of the pillars, they came from Bruxxus –https://www.thingiverse.com/thing:2168783– scaled to 12mm)
The file turned out quite big though, so I added another tray that’s more basic. It will fit on the tower just the same though.
Update 10-5-2019: New Tray_v2. There were comments on difficulties with printing the bannisters, so I’ve increased their thickness and hopefully that will make it better. Also included versions for low resolution and high resolution (small or big file).
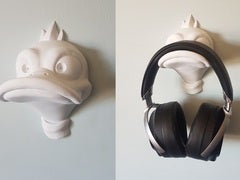
Made this for my sis to hang her headphones. A lot of hangers on thingiverse are great and waste less filament, but I wanted to make her something special.
Printed at 0.12, 10% infill. No supports, most printers should handle the bridging on the notches for the screws, and I left room for some sagging.
Holds my big MDR-Z7s no problem, you could scale down if you have smaller cans. You can fix it to the wall with one or two screws, nails or some heavy duty double sided tape.
UPDATE: Fixed a problem that base was not completely flat.
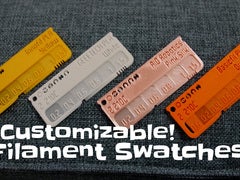
You need filament swatches for testing different colors and makes? You want to know the colors you have on spool at the moment?
Here are customizable filament swatches / tests, where you can change all the text using the thingiverse customizer (Press the button „Open in customizer“ above). This way you don’t have to print and stick any labels anymore.
You can customize:
If you print a swatch, please share a picture using the „post a make“ button.
This way we can collect here filament print quality via pictures…
If you like it, please have a look at all my customizable creations. There are configurable-text-based creations, multi-line label, gadget display stand, sweeping name plate, bunting banner, customizable text box III, pyramid text, name plate, Customizable text box with lid and round text. Have also a look at my configurable pack of dogs, rabbits, reindeers and santas. There are also useful coat hangers and finger toys.
Just have a look at all my customizable creations.
And…
As they are, the swatches fit into the configurable box from Jaxel. You can see the box in the 2nd picture. The box shown is also added here as .STL. Thanks a lot for the design!
Insipration came from different swatch cards here on thingiverse, all attached in the „remixed from“ section, and they seem to all go back to the design from venegade. Thanks go out to all of the designers for the idea and the subsequent iterations!
Thanks go out to teruteru314 for supplying the same model as solidworks file (.sldprt) which is now also included here.
There are some bug fixes in version „S“, thanks to Lyl3t for the review.
Thanks!
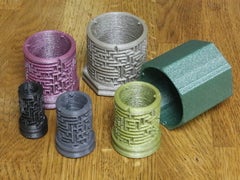
This is a multiple level maze puzzle box. i.e. you solve one puzzle, and find there is another, and maybe another, before you finally get to the middle and the prize.
Customise: https://www.me.uk/puzzlebox
Multiple parts often print better (and faster overall) if printed separately rather than all together, and you can change colours for each, which is a nice touch. No support needed.
Ideal for birthday/Christmas presents like cash or lottery tickets – or even a ring!
Examples here include a lottery ticket gift box, a box for pound coins, some useful boxes (e.g. for a ring, etc), and a number of test boxes to check the clearance works on your printer. Use the link above to make a random maze with your choice of settings (of which there are many).
If you like this, do click like even if downloading from www.me.uk
The example files here have been updated from time to time – see version.stl for date/time.
The new version adds: maze inside and alternating version; text on end and side of box; helical mazes; grip on the base to make is easy to use; cleaner model with much faster render in OpenSCAD; many more controls; and, a simple web form to create mazes.
You can create a new, random, and customised Open SCAD file from https://www.me.uk/puzzlebox
Or make it yourself – the C code is in github https://github.com/revk/PuzzleBox
The possibilities are endless! Credit to my son, James, for the idea of taking my maze boxes one step further for multiple levels – well done.
P.S. Yes, there is one small loop near the end of the maze just for fun.
[Note, licence is creative commons ATTRIBUTION. A commercial licence is available if not using CCA, at £10 per print sold. If you are not attributing you are either breaking the law by using without a licence and so costing me the £10 I would get, or are agreeing to the commercial licence. Either way you owe me £10 a print, plus legal costs if I choose to sue you to get it. So ATTRIBUTE any usage of this model.]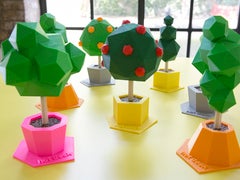
The company i work for http://www.wolffolins.com has a ’sit where you want‘ hot-desk policy, but how do you show people which desks are available? Easy, just download and printout these cute low poly trees, glue together and pop them on the desks – job done!
You can also choose the ‚blank‘ based versions and just print them as sweet little window trees
They could also make great ‚build‘ toys for children.
4 tree designs – each tree is split into 4 parts:
Pot (with additional ‚Hot desk‘ or blank base)
Soil
Trunk
Tree
Optional ‚fruit‘ to add a touch of colour
Printed in Faberdashery PLA
Print them at low res, low-ish infill, no supports needed.
Enjoy!
DISCLAIMER:
If using as a toy, Please, please keep small parts away from young children.
They could be a chocking hazard.
UPDATE: 290515
Added a ‚desk hottie‘ base – for that ’special‘ work colleague!
Tree_4_pot_hottie.stl
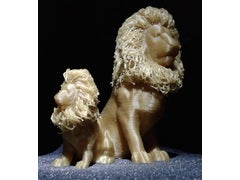
This is a Hairy Lion. As the name says it is lion with hair.
This is a remix from Geoffro’s design Lion HD (no supports required).
UPDATE #2: I made about 3 times bigger version. It has a lot of hair and they are also very long.
Watch Joel Telling’s (3D Printing Nerd) video about it: https://youtu.be/OTXPU2P-ElE
UPDATE #1: I made 50% smaller version. It should only take about 1-2 hours to print. But you must be much more careful when cutting the hair. This model has much less hair, so if you break or pull out too much hair, there will be visible bald spots.
The hair is connected to sacrificial wall, which is removed afterwards.
(See picture: post_processing.jpg) You can also try hot water to form the hair. Anyway, be careful not to burn yourself.
There was a request to add a brim to sacrificial wall. So I made it: „Hairy_Lion_with_brim.STL“
This was printed with ABS, but it should also work with other materials. If you are having problems, adjust bridging settings in your slicer.
You can find dual extrusion version here: http://www.thingiverse.com/thing:2050208

Nine different little low poly pumpkins ready to be printed for Halloween. Included are: Chompy, Slurpy, Crushy, Piercy, Slicey, Crunchy, Munchy, Smoochy and Squashy
They print quick without any support.
They can be stacked by snapping them together. LED lights can be put in them through the bottom.
Use single little pumpkins as decorations or stack them together then you can have them as a tower or hang them up.
Want to print them bigger and use a torch light with them? – Here is something for it: http://www.thingiverse.com/thing:1091056
On Twitter: https://twitter.com/TocoGamescom
All my Designs: http://www.thingiverse.com/Davision3d/designs/page:1 (sending a tip works now)
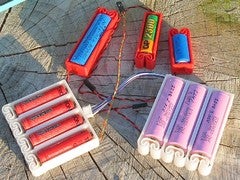
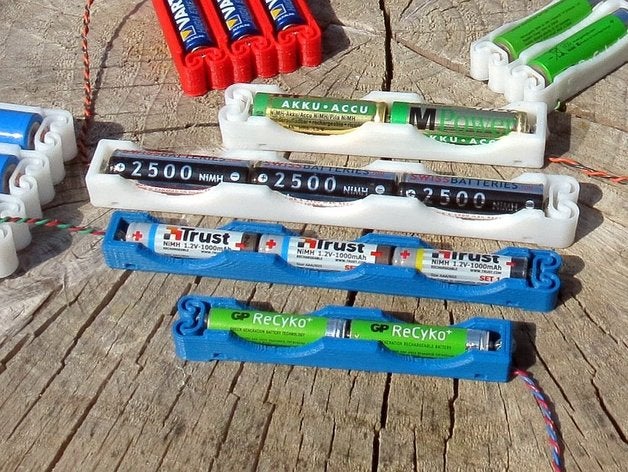
For my electronic projects I often need battery holders of various size and for different number of cells: single, multiple cells in parallel or in series, or serial lithium-ion type cells with connectors for balanced charging between the cells.
So the project here was to generate fully parametrized, printable battery holders for cylindrical cells of arbitrary size and number. The additional challenge for me was to have the battery sit firmly in the holder without the use of the metallic spring that is usually found at the minus pole. In this design the metallic spring is replaced by a flexible printed curled structure, which presses the contacts firmly to the battery. This plastic spring flexes about 1 – 2mm, which is just what’s needed to comfortably insert and remove the cells.
The contacts for the plus and minus pole can easily be made by a few windings of the uninsulated ends of the connecting wires. Each battery compartment contains are several holes to the outside as well ad to the neighboring compartments, through which connecting wires can be passed for easy configuring of parallel, serial or balanced-serial battery packs. Also, on the bottom of the case, there are longitudinal and traversal wire channels, which can be used for assing wires outside the case.
Given that the printed plastic spring needs to be flexible, ABS is the material of choice here. Also, I use a some „ABS slur“ (mixture of ABS and acetone) to cover and insulate the otherwise exposed outer part of the pole connectors.
In addition to the SCAD source file, I have added STL files for 1/2/3/4 cells of type AA, AAA, 18650(Li-Ion), as well as single cell versions for 18650P (protected Li-Ion), CR123A (aka 16340) and C (this one is untested yet, as I don’t have any C-cell around here).
Of course, you can also just use these battery holders without any wiring to serve as battery cases, for carrying your spare batteries around. But for this, you should also have a look at my battery caps…
Update 2014-09-17: Upon request of user wohenzhuce I have also added STL files for 26650 type LiFePo Cells. These are still untested. They were produced in OpenScad with the call:flexbatter(n=n,l=65.7,d=26.4,hf=0.72,shd=3,eps=0.28);
Update 2015-04-10: Upon request of user h4wk3y I have now uploaded extra long versions (70mm) needed for some protected 18650 cells, these are named flexbatter18700xN.stl._
Update 2015-07-25: I just published a new version of this project which supports multi-cell compartments housing 2 or 3 cells in a row: