
BEFORE YOU PRINT
Three parts need to be printed in Vase Mode / Spiral Printing:
The LED Strip Holder, Diffuser, and Shade.
-The Shade should be printed with 3-4 bottom layers, which become the top of the lamp.
-The LED Strip Holder and Diffuser need to be printed with no top or bottom layers, they’re basically completely hollow, single wall prints which slot into the lines in the Base.
Hope this helps. 🙂
UPDATE Feb 7, 2021
-Added versions of the Hex Shade, Diffuser, and LED Holder that can be printed on a printer with a Z limit of 180mm.
-Added new versions of the shades that are oriented in the intended print orientation.
-Updated the Spiral Shade to make printing more reliable.
UPDATE Jan 11, 2021
-Added a new variant of the base with greater tolerance to help with fit of the various vase mode parts. I also made a test fit print so you can print a small part to make sure it all fits before printing the whole base.
If using Cura to slice, go to the Shell settings, and set Initial Layer Horizontal Expansion to -0.12 This will help make sure the first layer squish doesn’t close up the slots where the shades fit.
~Original Post~
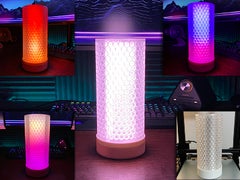
I designed this as a fun little project using extra parts I had lying around and am pretty happy with the results!
I’ve added a few outer shade designs I’ve created, but I’d like to see some of the ideas and designs you can come up with! 😀
Please check the Print Settings section below for printing instructions.
I used an ESP8266 as the controller and 6 strips of WS2812B 60/m.
Each strip has 14 LEDs which is what fits in the design as is.
However, this should work with any LED strip that is 10mm or less in width.
Total length of LED strip you’ll need is about 1.5m.
You will need a 5v DC power supply that can supply at least 2 Amps.
Here’s some Amazon links for the lights and ESP8266 I’m using:
WS2812B – 5m / 16.4ft 60pixels/meter
https://www.amazon.com/BTF-LIGHTING-Individual-Addressable-300Pixels-Non-Waterproof/dp/B088FJF9XD/ref=sr_1_7?dchild=1&keywords=ws2812b&qid=1610725714&sr=8-7&th=1
The ESP8266 is running WLED:
https://github.com/Aircoookie/WLED
Here’s a great tutorial on how to set up the ESP8266 for this, and similar projects.
https://www.youtube.com/watch?v=9d29SBWA4Qs
Once everything is set up, you’ll need to go into WLED and add 6 total segments.
For me, every other segment has the „Reverse Direction“ box checked since I’ve daisy chained the data wire. This ensures all the effects and patterns show right-side up.
Both the WS2812B LEDs and the ESP8266 run on a 5 volt supply. For the 84 LEDs in my version, a 2 Amp supply should be plenty to power them all at full brightness (although the WLED allows for setting a max current draw if needed).
I didn’t have a 5v supply that could provide enough current so I used a 12v supply and put it through a little buck regulator module to drop it to 5v. You won’t need this if you have a 5v power supply.
The little red PCB in the photo is just a little power distro board I made up, mostly for me to practice with crimping and those connectors. Definitely not needed. You can easily just connect all the negative and positive wires together and heat shrink or tape them up.
I hope you enjoy this and I get to see some Makes of this project.
Feel free to leave a comment with any questions and I’ll try my best to help!