Ball Clock 3D printed

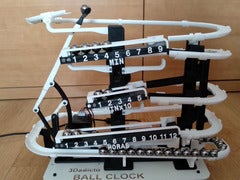
3D printed ball clock

The clock is based on a design from the ’70s by Harley Mayenschein, using marbles on three different rails to give a readout and to track time.
Although my design is more optimized to be smaller and uses an original lifting system using a bar mechanism.
It is quite accurate, it has an error of 6 seconds in 24 hours
In the following video the operation and assembly of the clock is explained:
https://www.youtube.com/watch?v=r3Faj1h3iq4

BOM:
16mm diameter steel balls – 30 units
Bearing Ø5x10x4 – 6 units
Calibrated round Ø5×50 – 3 units
Calibrated round Ø4×25 – 1 units
Calibrated round Ø6×250 – counter dams
set screw M3x6 – 2 units
Allen screw M3x16 – 15 units
Allen screw M3x8 – 15 units
Allen screw M3x20 – 2 units
Allen screw M2.5×12 – 8 units
Allen screw M2x6 – 2 units
Allen screw M4x12 – 3 units
Allen screw M4x10 – 4 units
Allen screw M4x8 – 1 units
Pin 5×16 – 16 units
Countersunk head screw M3x16 – 7 units
Nut M2 – 2 units
Nut M3 – 20 units
Nut M4 – 3 units
300x150x6.5mm wooden board
Motor Nema 17 1.7A – 1 unit
Driver DRV8825 – 1 unit
Arduino pro mini – 1 unit
Charging port – 1 unit

Upgrade 8-3-2021: The electronic schematic and the arduino program are added

Update 19-3-2021: part73b is added with the text of the hours in English „HOURS“

Fritz!Fon MT-F additional holder for the charging station

Somewhere I’ve heard that batteries don’t like it when they are constantly charged at 100%.
Therefore, we have always only placed our four Fritz!Fons on the charging station when the battery is down to at least 50%.
As a result, the phones are mostly located somewhere – usually far away from the charging station at a random location.

With this part, the charging station gets another telephone shelf on which the telephone will not be charged.

Desert’s Kiss – Diorama Dice Tower

Hi everyone!

This was an idea we had for the Mythic Mugs Graveyard Collection, but wasn’t able to squeeze in at the time.

It’s a detailed dice tower that can serve as a decorative diorama on its own.

If you liked the print and want to share it, feel free to share it on our Facebook Community:
https://www.facebook.com/groups/arsmoriendi3dcommunity/
Or Subreddit: https://www.reddit.com/r/ArsMoriendi3D/

Happy printing! 🙂

Visit our shop at https://arsmoriendi3d.com/
Or follow us on https://www.facebook.com/ArsMoriendi3D/

Change log:

Added the spider separately in two different versions. These do require supports, if you decide to print them:
Spider_Separate has an indent and will fit on top of the skull.
Spider_Separate_Full is the full version of the spider (for decoration or as a mini)

Version 1.2.5: Minor update. Strengthened the two lower front teeth a little and increased the area of the front left spider leg just a little to give it some more strength.

Version 1.2: Added teeth to the lower jaw due to popular demand! Both for aesthetics and to help catching dice coming out. Adjusted the inside slope a little more to try and slow down the dice. The spider’s front left leg has been more firmly secured to the skull to prevent it from breaking.

Version 1.1: Adjusted the slope inside the skull to make it less steep, as dice sometimes would come out too fast. This change should help but needs to be tested!

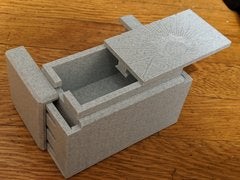
Puzzle Box || Easy Print, Hard Solution

This is an 8 piece durable puzzle box made be hard to solve and easy to print. Any rigid material should work but 2, 5mm MAGNETS ARE NEEDED I used these magnets: https://tinyurl.com/yxr2maud
ASSEMBLY AND SOLUTION PDF’S IN THE DOWNLOAD

Please check out my new puzzle it is a 10 piece sequential puzzle box with a 7 step solution:
https://www.thingiverse.com/thing:4628711

If you like the design please like it really helps!
Thanks!

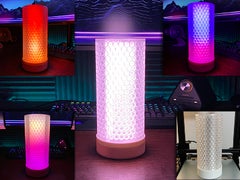
Chromalux Neopixel Lamp

BEFORE YOU PRINT
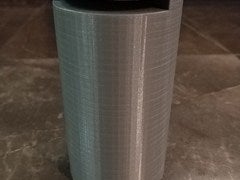
Three parts need to be printed in Vase Mode / Spiral Printing:
The LED Strip Holder, Diffuser, and Shade.
-The Shade should be printed with 3-4 bottom layers, which become the top of the lamp.
-The LED Strip Holder and Diffuser need to be printed with no top or bottom layers, they’re basically completely hollow, single wall prints which slot into the lines in the Base.

Hope this helps. 🙂

UPDATE Feb 7, 2021
-Added versions of the Hex Shade, Diffuser, and LED Holder that can be printed on a printer with a Z limit of 180mm.
-Added new versions of the shades that are oriented in the intended print orientation.
-Updated the Spiral Shade to make printing more reliable.

UPDATE Jan 11, 2021
-Added a new variant of the base with greater tolerance to help with fit of the various vase mode parts. I also made a test fit print so you can print a small part to make sure it all fits before printing the whole base.

If using Cura to slice, go to the Shell settings, and set Initial Layer Horizontal Expansion to -0.12 This will help make sure the first layer squish doesn’t close up the slots where the shades fit.

~Original Post~

I designed this as a fun little project using extra parts I had lying around and am pretty happy with the results!

I’ve added a few outer shade designs I’ve created, but I’d like to see some of the ideas and designs you can come up with! 😀

Please check the Print Settings section below for printing instructions.

I used an ESP8266 as the controller and 6 strips of WS2812B 60/m.
Each strip has 14 LEDs which is what fits in the design as is.
However, this should work with any LED strip that is 10mm or less in width.
Total length of LED strip you’ll need is about 1.5m.

You will need a 5v DC power supply that can supply at least 2 Amps.

Here’s some Amazon links for the lights and ESP8266 I’m using:

WS2812B – 5m / 16.4ft 60pixels/meter
https://www.amazon.com/BTF-LIGHTING-Individual-Addressable-300Pixels-Non-Waterproof/dp/B088FJF9XD/ref=sr_1_7?dchild=1&keywords=ws2812b&qid=1610725714&sr=8-7&th=1

3 Pack, ESP8266
https://www.amazon.com/KeeYees-Internet-Development-Wireless-Compatible/dp/B07HF44GBT/ref=pd_bxgy_2/132-6001542-3692506?_encoding=UTF8&pd_rd_i=B07HF44GBT&pd_rd_r=4145d663-e58b-495a-af4d-0ae73e83f5d5&pd_rd_w=g7Qp0&pd_rd_wg=iXfr3&pf_rd_p=f325d01c-4658-4593-be83-3e12ca663f0e&pf_rd_r=VEZM554A4H005EKKB69Z&psc=1&refRID=VEZM554A4H005EKKB69Z

The ESP8266 is running WLED:
https://github.com/Aircoookie/WLED

Here’s a great tutorial on how to set up the ESP8266 for this, and similar projects.
https://www.youtube.com/watch?v=9d29SBWA4Qs

Once everything is set up, you’ll need to go into WLED and add 6 total segments.
For me, every other segment has the „Reverse Direction“ box checked since I’ve daisy chained the data wire. This ensures all the effects and patterns show right-side up.

Both the WS2812B LEDs and the ESP8266 run on a 5 volt supply. For the 84 LEDs in my version, a 2 Amp supply should be plenty to power them all at full brightness (although the WLED allows for setting a max current draw if needed).

I didn’t have a 5v supply that could provide enough current so I used a 12v supply and put it through a little buck regulator module to drop it to 5v. You won’t need this if you have a 5v power supply.

The little red PCB in the photo is just a little power distro board I made up, mostly for me to practice with crimping and those connectors. Definitely not needed. You can easily just connect all the negative and positive wires together and heat shrink or tape them up.

I hope you enjoy this and I get to see some Makes of this project.
Feel free to leave a comment with any questions and I’ll try my best to help!


Soldering Fingers

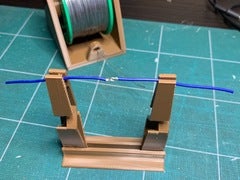
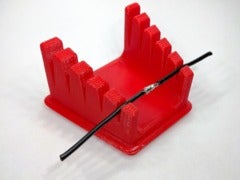
While this isn’t strictly a remix, I wanted to give „idig3d“ credit for the inspiration. I created a soldering helping hands http://www.thingiverse.com/thing:1635453 but when I saw idig3d’s version, I liked the simplicity and faster build time. I thought I’d create one that was similar but had additional grooves and a tapered top. Here is my interpretation.

Note: In the pictures, it looks like it’s floating a bit. That’s because I put little adhesive rubber feet so it won’t slide along my workspace while soldering.

I have recently created this helping hands as well. https://www.thingiverse.com/thing:2757071

Please share comments and makes!

Check out my other designs! https://www.thingiverse.com/mistertech/designs

This design has been stolen and sold on Ebay and other commercial sites. Thingiverse Tips are appreciated

If you do not have a 3D printer, consider purchasing a printed model from me on ebay. https://www.ebay.com/itm/Soldering-Fingers/132752109640?hash=item1ee8a47048:g:X5gAAOSw-ypbe5Sp