
via YouTube Borderlands 3 Bounty of Blood DLC #08 – Bro-Coop PS5
Destruction AllStars PS5 4k60 HDR First Steps
via YouTube Destruction AllStars PS5 4k60 HDR First Steps
Ethernet | RJ45 clip to secure/repair/fix broken tab

This clip was design to fix/repair/secure the broken or loose tab of a RJ45 Ethernet connector and avoid crimping. Designed to prevent from moving, wiggling, falling from the connector and easy to install.
UPDATE v.4.9 | 28/01/2021
Added the 3 following files which have slightly wider body (0.25mm) than 4.7 version and small upgrade on the tip.
1. „4.9.nf.supported“ (extension) comes „with supports“ for the ones are not very familiar with. But I still prefer S3D’s supports.
2. „4.9.nf“ (extension) with „no fillet“, to make it easier printing with supports.
3. „4.9“ (extension) with fillet, for „smooth edges“. On FDM printers isn’t that much noticeable.
UPDATE v.4.7 | 01/01/2021
Added another version with „no fillet“ („.nf“ extension), actually it has sharp edges to make it easier printing with supports.
Printing
Suggested printing orientation is the one as the files are stored, why?
Printing the tab from the base to the tip in X-Y axis makes it stronger and more flexible since its printed in one continued string.
If you change the orientation with the tip on top then tab’s base will start from the bottom and builds up while the Z axis is sticking the rest of it till the tip. With this orientation the tab has more possibilities to brake since Z layers don’t bond the same as the method I suggested.
*If you have another solution let me know.
Supports
Supports needed and you need to be experienced with good slicer settings. Also attention needed when removing them from the actual print.
Or you can print the file with „4.8.nf.supported“ (extension) which comes with supports. But I still prefer S3D’s supports.
Installation note:
1.Before install the „printed clip“ check the left overs of the broken tab. If it is too long the tip of the „printed clip“ might not click underneath the left-over. So, I suggest to leave a length of the broken tab about „0,5-1,0mm“. If the broken tad left-over is to small or cuted flash then the printed one might not click and hopefully that would work well, haven’t tested that scenario.
2.Follow the sketches to install the „printed clip“, also while sliding in if you find it a bit hard some wiggling might help.
*You may call it the „ScorpioNet“ or „Devil’s Network Tail“!
- Designed in Inventor
If you enjoy and want to support my work you can donate me on the link below,
Thank you!

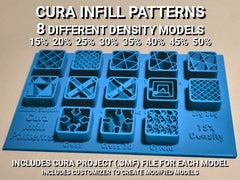
Cura Infill Patterns Display Models
Cura Infill Patterns Display Models
This is a collection of Cura Infill Pattern Displays with models for 15%, 20%, 25%, 30%, 35%, 40%, 45%, and 50% infill density. Cura project files (.3mf) are included for each of the densities for easy printing setup. The project files have all of the necessary support blockers.
I saw ccarbs 20% density model (remix source) and liked the idea, but it would require 120 grams and take 9 hours 46 minutes to print with draft settings. Ain’t nobody got time for that! And the amount of material is even more of a concern.
So I designed my own model from scratch for 15% density, which is what I typically print at. And since it was easy to change the density on the model and the density in the print settings I made models and project files for each of the commonly used densities in case anyone wants one of those. These models require about 1/4 the material and print time as ccarbs original model.
The first picture is a photo of a printed model but all others are rendered images that I made by converting the G-code from Cura to STLs using Voxelizer and then rendering the sliced STL models with Blender.
2021-01-22 update: added an OpenSCAD customizer in case anyone wants to create one for another density or make other modifications to the model.
Cura Project Files
The Cura project files are all the same except for the model itself, which indicates the density and the infill density setting specified in the profile. They all use the draft profile with the layer heights set to 0.2 mm and the number of top and bottom layers set to 0. The model has an overlap-modifying cutting mesh support blocker sized 136x88x2 at [0,0,0] with 4 top layers and 4 bottom layers specified. The model also has an overlap-modifying cutting mesh support blocker for each infill pattern with the appropriate infill pattern specified and are sized 19x19x11 at [X,Y,2] where X=[-48,-24,0,24,48] and Y=[-24,0,24].
After loading the project file, select your printer instead of the printer loaded in the project file (an Ultimaker Original Dual Extrusion).
The model and support blockers are all configured to use extruder 1. If you need to change them to use extruder 2 on your printer, you can select them all by CTRL clicking each of them in the object list and then set them all at once to use extruder 2 by pressing CTRL/2.
Change any settings you want in your print settings and make sure that the infill density matches what’s specified on the model.
Material and Time Estimates
The estimated amount of filament and time to print on my Flashforge Creator Pro using the draft profile are listed below. The time will be different for your printer and settings. I printed my 15% model using my usual settings (slower print speed of 40 mm/sec) and it took 4 hours 20 minutes.
15% density model: 33g, 10.92m, 2h47m
20% density model: 34g, 11.55m, 2h53m
25% density model: 36g, 12.16m, 2h59m
30% density model: 38g, 12.72m, 3h05m
35% density model: 40g, 13.38m, 3h12m
40% density model: 42g, 14.00m, 3h17m
45% density model: 44g, 14.62m, 3h23m
50% density model: 45g, 15.19m, 3h31m
Tip: Three top and bottom layers should be sufficient for the base. You can shorten the print time and save about 4 grams of material by changing the # of top and # of bottom layers to 3 in the large support blocker that encompasses the base.
 Some of My Designs
Click an image below (opens in a new tab) or go to my designs page and see them all.
If you see some thing that you like  , please click the
  Like button and turn that heart red
  .
.


Resident Evil VIII – Maiden PS5 Exclusive Demo (Village) 4K HDR
Flexing battery holders with 2- and 3-cell compartments
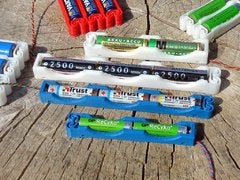
Thingiverse user pcoulbourne asked me if I could extend my flexing battery holders with integrated spring project to also support multi-cell compartments which house 2 or 3 cells in series and are held with a single plastic spring.
With more than one cell in a row the pushing force of the spring is prone to lift the batteries up at their joining point and push them out of the compartment. Also longer cells are more prone to cause warping. The solution to these problems was to add cutouts at the center of each cell to allow a better grip when manipulating the cells (and thereby reducing the warping!) and add an inside overhang between the cutouts to prevent the batteries from popping out.
The included fully parametrized SCAD file is an extension to the initial version, thus it can as well be used to generate all the single cell compartment battery holders from the initial project. However, the STLs included here are only the ones with 2- and 3-cell compartments for some of the more common cell types. I started by including ready-to print STLs for AA, AAA, C and 18650 type cells, others might follow. But of course you can easily generate multi-cell holders for any other cell type yourself by adding the corresponding module calls in the OpenScad source file.
Note that when having 2 or 3 cells secured by a single plastic spring, even small variations of the cell length may become critical, since the differences are dupli- or triplicated. Small differences can be compensated to some extent by varying the thickness of the pole contacts.
I suggest to load and unload the batteries from the plus end of the compartment (opposite side of the spring) and slide the cells there as showing in one of the pictures. Pushing the batteries through the overhang generates stress on the side walls of the case, especially for the smaller cells.
For any further details, please check out the initial version of this project.
Borderlands 3 Bounty of Blood DLC #07 – Bro-Coop PS5
Gus…tav, Gusgustav
via YouTube Borderlands 3 Bounty of Blood DLC #07 – Bro-Coop PS5
Cyberpunk 2077 Secret Developer Room Easteregg Johnny Silverhand Guitar PS5
Borderlands 3 Bounty of Blood DLC #06 – Bro-Coop PS5
Bonus: doofe Texteinblendungen 😁
(zumindest die ersten Minuten)
… also den Laber Part vielleicht doch nicht skippen. 😄
via YouTube Borderlands 3 Bounty of Blood DLC #06 – Bro-Coop PS5
Dirt 5 Career/Kampagne #01 (Happy New Year) PS5
Hi there! New to SmashDde? If so, here’s what you need to know — I like gaming, especially co-op with my bro, a LOT, and streaming game playthroughs, how-tos, easter eggs… you name it. Currently mostly on PS4Pro, hopefully sooner than later on PS5 and occasionally on PC. So please feel invited to be part of the fun, share your thoughts in the comments and smash that ‚like‘ button, thanks!
Support SmashDde at https://ift.tt/36YTphD and get your channel membership at https://www.youtube.com/user/SmashDde/membership to give suggestions or vote on the next titles to stream!
DONATIONS: https://ift.tt/36YTphD
MEMBERSHIP: https://www.youtube.com/user/SmashDde/membership
AMAZON*: https://amzn.to/2ZXPCj7
TWITTER: https://twitter.com/smashdde
INSTAGRAM: https://ift.tt/2ZQ0jEe
WEB: https://smashd.de
*The used link is a affiliate one. When you buy a product using this link I will receive a small provision, but your price remains the same. Thanks so much for your support 🙂
*Bei dem Link handelt es sich um einen sog. Affiliate Link. Durch einen Kauf über den Link werde ich am Umsatz beteiligt, hat für Dich aber keine Auswirkungen auf den Preis. Danke sehr für deine Unterstützung! 🙂
Video + music assets by mixkit.co
via YouTube Dirt 5 Career/Kampagne #01 (Happy New Year) PS5